Showing posts with label social media. Show all posts

Saturday, 9 January 2016

Bagaimana Cara Posting Foto atau Video di Instagram dari Web?

instagram
Menurut sebuah studi terbaru oleh Pew Research Internet Project, Instagram kini adalah jejaring sosial yang pertumbuhannya paling cepat. Entah bagaimana Instagram telah berhasil menemukan keseimbangan yang tepat antara social sharing dan social interaction. Hasilnya adalah sebuah tren pertumbuhan yang populer dan capable, serta semakin banyak penggunanya.

Hal ini menjadi waktu yang sangat tepat untuk melakukan pemasaran. Berikut adalah beberapa alat untuk meningkatkan pengalaman ber-Instagram Anda. Dengan bantuan tools ini, Anda dapat menggunakan layanan dari komputer Anda dan bukan lagi Smart Phone, melakukan penjadwalan posting, dan lain sebagainya.

Letergram
Idenya cukup sederhana. Anda meng-upload satu atau beberapa gambar/ video baik dari web atau telepon. Anda atur jadwalnya sehingga mereka akan dirilis sesuai dengan apa Anda inginkan. Anda akan mendapatkan peringatan sebelum jadwal penerbitan/ posting, sehingga Anda dapat mengubah/ menghapus posting atau memverifikasinya.

latergram

Karena Anda harus mengotorisasi penerbitan pada saat itu dijadwalkan, ini lebih merupakan cara untuk memantau kalender postingan Anda daripada auto posting. Ini adalah alat yang hebat untuk memberikan pengalaman berbeda untuk Anda. Silahkan bisa dicoba.

Schedugram
  • Menjadwalkan update Instagram dari mobile
  • Memposting dan Menjadwalkan update Instagram dari web
  • Dukungan multiple account Instagram
Jika Anda menginginkan sesuatu yang sangat sederhana mengenai penjadwalan dan auto-posting foto/ video di Instagram, maka Anda perlu tahu ini. Yang satu ini dianjurkan untuk Anda gunakan. Upload melalui browser Anda, mengelola beberapa account, dan memungkinkan beberapa akses administrator. Setelah yang Anda jadwalkan terposting, Anda akan mendapatkan peringatan dari email. Jadi, setiap kali mungkin ada masalah, Anda akan segera tahu.

Tool ini juga memiliki beberapa dukungan upload, sehingga Anda dapat menempatkan sekelompok foto atau video sekaligus, mengedit informasi seperti meta data, dan kemudian menjadwalkan mereka semua sekaligus. Ini jauh lebih efisien daripada melakukannya satu per satu.

Nah, dua tool di atas kami rekomendasikan untuk Anda yang menginginkan upload foto atau video di Instagram secara terjadwal. Hal ini sangat menguntungkan untuk melakukan promosi sehingga Anda tidak perlu membuka mobile phone Anda di saat Anda sedang sibuk hanya untuk memposting foto atau video produk Anda di Instagram pada jam yang Anda inginkan.

Oke, apabila Anda memiliki tips lain mengenai Instagram silahkan share di kolom komentar. Kami akan sangat menyukainya. Terimakasih!

Monday, 28 December 2015

Kapan Waktu Terbaik Untuk Posting di Facebook, Twitter, dan Pinterest?

jadwal-social-media
Salah satu trik media sosial yang paling penting yang saya pelajari adalah mempertahankan jadwal posting. Hal ini tidak hanya akan membawa konsistensi untuk pekerjaan Anda, tetapi juga akan menghemat waktu yang berharga. Tetapi, melakukan penjadwalan itu sendiri tidak akan memberikan banyak keunggulan kecuali jika Anda mengetahui waktu yang tepat untuk melakukan posting. Jadi, bukan hanya tentang apa yang Anda kerjakan tapi juga kapan Anda melakukannya. Dengan mengetahui kapan audience Anda bangun dan memeriksa Facebook, dapat memberikan keajaiban kecil bagi reputasi sosial Anda.

Jadi pertanyaannya adalah kapan waktu yang tepat untuk posting di situs media sosial seperti Facebook, Twitter, Pinterest, dan sebagainya? Jawabannya tergantung banyak faktor dan ini adalah saatnya Anda melakukan analisis terhadap sosial media. Tapi sebelum Anda membuka Facebook dan melakukannya, mungkin ada beberapa saran yang bisa Anda perhatikan untuk jaringan media sosial tertentu.

Seperti yang saya katakan bahwa analisis media sosial dapat membantu meningkatkan reputasi blog Anda. Tapi Anda tidak cukup hanya tahu kapan dan berapa banyak pengunjung Anda yang sedang online. Akan jauh lebih baik jika mereka semua juga terlibat dalam aktivitas klik, like, atau share. Di sinilah fungsi dari beberapa platform yang mungkin perlu Anda manfaatkan seperti contohnya AddThis. Platform ini memungkinkan pengunjung Anda untuk menyukai dan membagikan artikel Anda ke media sosial yang mereka miliki.

Variasi Waktu untuk Berbagai Jaringan Sosial
AddThis telah menyusun sebuah laporan dari 14 juta website lebih yang menggunakan platform ini dan menyajikan data analisisnya yang dapat membantu kepentingan kita.

variasi-waktu-jaringan-sosial-1

Data ini menggambarkan kapan waktu puncak klik dan share yang berasal dari 14 juta situs lebih yang menggunakan tool AddThis ini. Dari data tersebut kita bisa tahu waktu yang tepat untuk melakukan posting artikel kita di media sosial. Ini akan sangat membantu meningkatkan jumlah traffic blog kita.

klik-share-facebook

Gambar di atas menyajikan sebuah data pengguna facebook di salah satu website berdasarkan persentase terhadap jam sehari. Kita dapat melihat bahwa sebagian besar aktivitas di Facebook terjadi pada malam hari baik itu klik maupun share. Sangat sedikit aktivitas share yang terjadi pada siang hari, puncaknya terjadi sekitar jam 6-12 PM. Beberapa klik dan share juga terjadi di siang hari namun angkanya hanya sedikit. Biasanya orang mengakses Facebook ketika jam kantor akan dimulai dan di malam hari ketika mereka sudah pulang.

Menurut AddThis, tren klik dan share untuk Twitter hampir sama dengan Facebook yaitu puncaknya terjadi di malam hari dan beberapa di siang hari. Tetapi Pinterest sebagian besar digunakan di sore dan malam hari.

Nah, jika dikaji lebih jauh lagi berdasarkan hari tentunya juga akan berbeda antara senin sampai minggu. Berikut adalah observasi yang lebih mendalam lagi dari AddThiss.

variasi-waktu-jaringan-sosial-2

Kesimpulan
Dengan memperhatikan waktu posting kita di media sosial, ini akan memberikan dampak yang bermakna bagi blog kita. Data di atas telah memberikan wawasan kepada kita mengenai hal kecil namun penting. Semuanya tergantung pada diri Anda, Anda dapat berbagi hal-hal yang Anda tulis di pagi hari ketika rata-rata orang sedang pergi ke kantor. Tetapi yang terbaik untuk konten Anda adalah di sore dan malam hari ketika sebagian besar audience Anda sedang aktif dan terlibat. Anda juga harus melihat hari yang paling populer untuk postingan Anda.

Masih banyak sekali data yang berguna untuk Anda dan blog Anda yang berkaitan dengan sosial media. Silahkan jangan lelah untuk terus mencari sesuatu yang terbaik demi kemajuan diri Anda. Hal di atas sebenarnya mempelajari perilaku manusia dan kita memanfaatkan itu untuk kepentingan kita.

Apakah ada sesuatu yang berguna untuk ditambahkan? Kolom komentar kami selalu menunggu partisipasi Anda. Terimakasih. . .

Wednesday, 7 October 2015

How to Add Font Awesome Social Icons in Blogger

It's near impossible to find a blog or site these days without at least one social media account to their name. Be it Twitter or Facebook, Instagram or Pinterest, or all of those for that matter, what's become increasingly clear is that social media helps increase your online presence.

Gone are the days when you used to rely on good old search engine results alone. These days, maybe you don't rank well in results for your keyword on Google or any other search engine, but you can launch a social media campaign that can hopefully give you the results that you want.

Essentially, your site and social media need to co-exist. One cannot live without the other, if you want another way of putting it. Social media is one of the best drivers of traffic on the internet, and if you want to increase your chances of being seen, then you have got to get an account on one or more platforms as long as it fits with your brand's identity.

font awesome social icons

Spreading Awareness of Your Social Media Presence

Once you've set up your social media accounts, you don't just leave it there to be discovered. Sure, you can make use of hashtags and communicate with industry leaders, but that's not enough to bring awareness to your customers. To let them know you have a presence on Facebook, Twitter, Instagram, Vine or Pinterest, you have to make use of the real estate on your website.

How exactly do you do that, you ask? Well, by means of social icons.

Social icons are those little images you see that represent a symbol associated with a particular social network. For example, social icons for Twitter usually feature a blue bird. If not that, then a lowercase letter T.

The presence of these images remind your viewers that they have other ways of being up to date with whatever you put out. Social media use is pretty high these days thanks to the immediacy of the medium as well as the fun factor. And more likely than not, your audience would want to know whether you're on any social network.

If you're on the Blogger platform, you can add these social media representations through Font Awesome social icons.

What is Font Awesome?

Font Awesome "gives you scalable vector icons that can instantly be customized - size, color, drop shadow, and anything that can be done with the power of CSS". In essence, it functions as a toolkit where you get access to more than 500 icons for use on your site - free of charge.

Now, if you've used social media icons before, you know that there are non-vector varieties. But those offered by Font Awesome are scalable vector icons, and in the long run, they are the better option for your site.

Why is that the case?

Well, a very good reason would be that images take time to load. Yes, these images are tiny but the point still stands. Plus, images tend to lose their quality as computer resolution increases. In other words, if you want your icons to load faster and have a nice, crisp and clean look, then you're better off with using the collection of Font Awesome. Also, the chance to customize your icons accordingly is definitely an attractive factor too.

Why you should start using Font Awesome?

Of the many providers out there, why stick with Font Awesome?

  • Large collection of icons. You'll not only find social media icons here, but other traditional icons as well.
  • CSS support. With CSS, you can adjust the icons according to what suits your site best. You can tinker with the colors, size, shadows and other components. This is something sorely lacking with non-vector images because you're stuck with the icon you chose.
  • Speed. Vector images are lightweight and therefore load faster.
  • Free. You don't have to pay a single thing when you use Font Awesome.
So now you know the importance of icons on your site, it's time to learn how to add Font Awesome icons in Blogger.

Adding Font Awesome Social Icons in Blogger

The adding of icons to your Blogger isn't rocket science. In fact, the process is pretty straightforward.
Here's what you have to do:

Add Font Awesome Stylesheet into Blogger

Follow the steps below to get Font Awesome working with your blog:
1. Download Font Awesome from the official page.
2. Copy the entire font-awesome directory into your project.
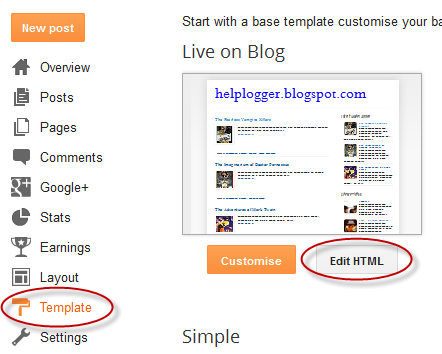
3. Open your Blogger dashboard, go to Template and press the Edit HTML button. Find the <head> tag then add this line of code referencing the location of your font-awesome.min.css stylesheet.

font awesome stylesheet

Or if you'd prefer the easiest method, add this line just below the <head> tag:
<link rel="stylesheet" href="https://maxcdn.bootstrapcdn.com/font-awesome/4.4.0/css/font-awesome.min.css" />
4. Start playing with Font Awesome!

Using the Font Awesome Icons

After you get the steps in the previous section done, you're now ready to use Font Awesome in your blog. The first thing you need to do is add the social icons links to the HTML and delete the icons that you don't need anymore. This is a sample HTML that you can add:
<div id="fawesomeicons">
<a href="URL-HERE" title="Facebook" target="_blank" rel="nofollow"><i class="fa fa-facebook"></i></a>
<a href="URL-HERE" title="Google Plus" target="_blank" rel="nofollow"><i class="fa fa-google-plus"></i></a>
<a href="URL-HERE" title="Twitter" target="_blank" rel="nofollow"><i class="fa fa-twitter"></i></a>
<a href="URL-HERE" title="Pinterest" target="_blank" rel="nofollow"><i class="fa fa-pinterest"></i></a>
<a href="URL-HERE" title="Instagram" target="_blank" rel="nofollow"><i class="fa fa-instagram"></i></a>
<a href="URL-HERE" title="Bloglovin" target="_blank" rel="nofollow"><i class="fa fa-heart"></i></a>
<a href="URL-HERE" title="Tumblr" target="_blank" rel="nofollow"><i class="fa fa-tumblr"></i></a>
<a href="URL-HERE" title="RSS" target="_blank" rel="nofollow"><i class="fa fa-rss"></i></a>
</div>
In the above HTML code, we can see 8 separate social icons which can be recognized by looking at the link title attribute. For example, the first one is for Facebook.

To use the social icons, paste your URL where it says URL-HERE for each social icon you want to include. Put the link between the quotes and make sure to not remove any of the quotation marks.

If you want to remove a social icon, just delete that line of code starting with "<a href" and ending with "</a>".

Now, keep in mind that Font Awesome works anywhere with the <i> tag as it was designed to work with inline elements. Although you can use <span>, official documentation prefers the <i> option for brevity.

Font Awesome icons can be placed anywhere using the CSS prefix fa together with the name of the icon. For a list of social media icon names, you can refer to the official website of Font Awesome.

Let's say that you want to display a Youtube icon so you can link it to your official account on the platform. Find the Youtube icon on the list and click on it:

font awesome icon

That will bring you to a page for Youtube where you will see this code:

font awesome social icons

To include the icon within the list, copy any line starting with "<a href" and ending with "</a> from the code above, paste where you want it to appear and replace the code starting with "<i class="fa " and ending with "</i>" with that of your chosen icon.

Finally, after adding the icon, the list will look like this:
<div id="fawesomeicons">
<a href="URL-HERE" title="Facebook" target="_blank" rel="nofollow"><i class="fa fa-facebook"></i></a>
<a href="URL-HERE" title="Google Plus" target="_blank" rel="nofollow"><i class="fa fa-google-plus"></i></a>
<a href="URL-HERE" title="Twitter" target="_blank" rel="nofollow"><i class="fa fa-twitter"></i></a>
<a href="URL-HERE" title="Pinterest" target="_blank" rel="nofollow"><i class="fa fa-pinterest"></i></a>
<a href="URL-HERE" title="Instagram" target="_blank" rel="nofollow"><i class="fa fa-instagram"></i></a>
<a href="URL-HERE" title="Bloglovin" target="_blank" rel="nofollow"><i class="fa fa-heart"></i></a>
<a href="URL-HERE" title="Tumblr" target="_blank" rel="nofollow"><i class="fa fa-tumblr"></i></a>
<a href="URL-HERE" title="RSS" target="_blank" rel="nofollow"><i class="fa fa-rss"></i></a>
<a href="URL-HERE" title="Youtube" target="_blank" rel="nofollow"><i class="fa fa-youtube"></i></a>
</div>
Note: don't forget to change the title and add your URL between the quotes.

Once you've finished editing the icons, insert the code into a HTML/Javascript gadget by going to "Layout" and click on the "Add a gadget" link. If you're using WordPress, paste it in a Text widget.

Customize the Font Awesome Icons Using CSS

Suppose you want to make the icons a lot bigger than they currently are. That task is made simple with the use of CSS. Here's a sample code:
#fawesomeicons a {
    font-size: 16px;
    width: 30px;
    height: 30px;
    line-height: 30px;
}
To change the font size, increase or decrease the 16px value. Below are the values (30px) for the container's width and height which should always match. Increasing/decreasing these values, will increase/decrease the size of the container where is the font.

Here are some different styles for the font awesome social icons. In the CSS, look for the #background-color, #border-color, #font-color and #hover-color text so that you can know here to put the color codes. You can use this tool to generate the color code: Color Code Generator. If you don't know how to add CSS, follow this tutorial.

font awesome social icons

#fawesomeicons {
text-align: center;
}
#fawesomeicons a {
background: #background-color;
color: #font-color;
display: inline-block;
font-size: 16px;
width: 30px;
height: 30px;
line-height: 30px;
margin: 0 1px 6px;
}
#fawesomeicons a:hover{
background: #hover-color;
}

font awesome social icons

#fawesomeicons {
text-align: center;
}
#fawesomeicons a {
background: #background-color;
color: #font-color;
display: inline-block;
font-size: 16px;
width: 30px;
height: 30px;
line-height: 30px;
margin: 0 1px 6px;
-webkit-border-radius: 100%;
-moz-border-radius: 100%;
border-radius: 100%;
}
#fawesomeicons a:hover{
background: #hover-color;
}

font awesome social icons

#fawesomeicons {
text-align: center;
}
#fawesomeicons a {
border: 1px solid #border-color;
color: #font-color;
display: inline-block;
font-size: 16px;
width: 30px;
height: 30px;
line-height: 30px;
margin: 0 1px 6px;
}
#fawesomeicons a:hover{
background: #hover-color;
}

font awesome social icons

#fawesomeicons {
text-align: center;
}
#fawesomeicons a {
border: 1px solid #border-color;
color: #font-color;
display: inline-block;
font-size: 16px;
width: 30px;
height: 30px;
line-height: 30px;
margin: 0 1px 6px;
-webkit-border-radius: 100%;
-moz-border-radius: 100%;
border-radius: 100%;
}
#fawesomeicons a:hover{
background: #hover-color;
}

font awesome social icons

#fawesomeicons {
text-align: center;
}
#fawesomeicons a {
color: #font-color;
display: inline-block;
font-size: 23px;
margin: 0 6px 6px;
}
#fawesomeicons a:hover{
background: #hover-color;
}

Now, what if we want to change the background or font color of a specific icon? First, we need to identify the icon class which is just after the <i class="fa ..." and add it like this:
#fawesomeicons a .fa-facebook {
background: #background-color;
color: #font-color;
}
Here, we can change the background and color for the Facebook icon but we can do it for any icon you want. For example, let's add another rule for the twitter icon:
#fawesomeicons a .fa-facebook {
background: #background-color;
color: #font-color;
}
 #fawesomeicons a .fa-twitter {
background: #background-color;
color: #font-color;
}
To make the fonts bigger, we can add the CSS code like this:
#fawesomeicons {
text-align: center;
}
#fawesomeicons a .fa{
display: inline-block;
font-size: 16px;
width: 30px;
height: 30px;
line-height: 30px;
}
#fawesomeicons a .fa-facebook {
background: #background-color;
color: #font-color;
}
 #fawesomeicons a .fa-twitter {
background: #background-color;
color: #font-color;
}
To apply, copy the code above and add the CSS rule with the icon class that you wish to change.

Important: When adding the class for your icon, always put a dot (.) in front of it as you can see in the example above, otherwise it won't work.

And that's it! Hopefully, this tutorial helped you to add Font Awesome social icons in Blogger. If you're still in trouble adding them, please take a look at Examples page.

Saturday, 21 February 2015

Pilihlah Siapa Pengelola Facebook Anda Setelah Anda Mati

Facebook-legacy-contact
Pernahkan Anda memikirkan sesuatu tentang apa yang akan terjadi pada akun online Anda setelah Anda mati nanti? Kematian manusia jelas tidak dapat dihindari dan banyak orang cenderung tidak berpikir tentang hal itu terlalu banyak. Tapi apakah Anda pernah bertanya-tanya apa yang akan terjadi pada akun Anda itu? Akankah mereka tetap terkunci selamanya karena tidak ada yang tahu password Facebook Anda. Facebook memiliki jawabannya, sekarang Anda dapat memutuskan siapa yang akan mengelola akun Facebook Anda setelah Anda pergi untuk selamanya!

Jika Anda berpikir tentang hal itu, seluruh ide ini cukup lucu. Sementara, mungkin ada banyak orang di luar sana yang menuliskan password mereka dalam file yang terenkripsi, kunci yang terkandung dalam surat wasiat mereka, sejumlah besar orang tidak banyak memikirkan ini dan karenanya akun mereka terkunci selamanya. Memang hal ini mungkin tidak terlalu penting tapi mengetahui hal ini juga tidak rugi kok!

Dengan fitur Legacy Contact ini Facebook sekarang ingin Anda untuk berpikir tentang siapa yang Anda percaya untuk memiliki akses terhadap akun Anda setelah Anda meninggal nanti. Dan kali ini saya akan sedikit menjelaskannya.

Facebook Legacy Contact
Anda dapat memilih kontak terpercaya - teman atau anggota keluarga, untuk menjadi Kontak Legasi Anda. Setelah Facebook diberitahu bahwa seseorang telah meninggal, ia akan mengenang akun mereka dan kata "Remembering" akan muncul di belakang nama profil mereka. Legacy Contact (jika dipilih) maka akan dapat mengakses almarhum pemilik akun.

Legacy Contact akan dapat:
  • Membuat posting atas nama akun almarhum (misalnya untuk membuat pengumuman).
  • Menanggapi permintaan teman baru dari anggota keluarga dan teman-teman yang belum terhubung.
  • Update gambar profil dan cover foto.
Legacy Contact tidak akan DAPAT mengakses ke:
  • Informasi akun login
  • Account Settings
  • Personal messages (inbox) dari orang yang meninggal
Anda dapat melihat atau menambahkan warisan dengan masuk ke akun Settings >> Security >> Legacy Contact. Dari sini, Anda dapat memilih apakah Anda ingin bahwa kontak dapat mendownload dan melakukan peng-arsipan dari gambar profil, foto, tulisan, dan lainnya.

(Jika Anda belum melihat opsi ini, jangan khawatir. Fitur ini telah dikenalkan di Amerika Serikat dan sedang digulirkan perlahan ke pengguna lain di seluruh dunia).
legacy contact
Atau, Anda dapat memilih opsi untuk menghapus akun Anda secara permanen setelah kematian Anda. Yah, semoga kita semua diberi kebahagiaan dan umur panjang, Aamiin!!! Semoga sukses :)

    Tuesday, 4 March 2014

    Bagaimana Cara Menjadwal Posting Blog di Google Plus?

    schedule google plus posts
    Penjadwalan postingan adalah salah satu fitur yang paling penting dalam pemasaran di jaringan sosial. Penjadwalan membantu dengan konsistensi, dan konsistensi dapat membuat perbedaan antara keberhasilan dan kegagalan. Banyak situs sosial memiliki fitur ini termasuk platform blogging, Facebook, Pinterest, dll. Kecuali untuk Google Plus, memang aneh karena Google Plus dibangun untuk pemasaran. Tapi itu tidak berarti Anda tidak bisa melakukan penjadwalan. Berikut adalah beberapa cara untuk menjadwalkan update di Google Plus.

    Catatan : Sejak Google Plus tidak menunjukkan minat yang melekat dalam memberikan fitur ini untuk para penggunanya, Anda harus memikirkan solusi pihak ketiga untuk melakukan penjadwalan.

    Do Share for Chrome
    Jika Anda sedang mencari cara cepat untuk melakukan jadwal update Google Plus Anda, silahkan download ekstensi Do Search for Chrome. Cukup tambahkan ekstensi ini dan klik ikon ekstensi pada toolbar untuk memulainya.

    Do Share

    Jika Anda sudah masuk ke Google, Anda akan melihat antarmuka yang bagus dan mudah untuk membuat dan mengelola postingan Anda. Anda dapat membuat draft, select circles, menjadwal posting Anda, dan banyak lagi.

    schedule

    Apa yang saya suka tentang aplikasi kecil ini itu memungkinkan Anda memperbaharui halaman Anda serta profil Anda. Klik pada tanda panah di sebelah gambar tampilan Anda akan menampilkan draft semua halaman yang dikelola. Anda dapat menambahkan update ke salah satu halaman tersebut.

    Tentu saja ini adalah ekstensi browser, sehingga hanya bergantung pada browser yang terbuka pada waktu yang Anda tetapkan untuk penjadwalan postingan Anda. Jadi ini tidak akan berguna jika Anda ingin menjadwalkan posting untuk hari sebelumnya. Tapi Anda tidak akan sibuk untuk bolak balik ke Google Plus, maka ini adalah alat yang berguna.

    Buffer
    Buffer adalah banyak digunakan layanan auto-scheduling seperti HootSuite untuk sebagian besar jaringan sosial termasuk Facebook, Twitter, LinkedIn, dan banyak lagi. Baru-baru ini menambahkan dukungan untuk Google+ Pages. Dukungan ini menggunakan API resmi Google sehingga Buffer harus bekerja sangat baik bagi orang-orang yang membutuhkan untuk menjadwalkan update ke Google+ Pages.

    buffer

    Dengan Buffer Anda dapat menjadwalkan postingan dari situs Buffer, ekstensi browser, atau di mana pun Anda. Dukungan Google+ tersedia untuk semua orang karena disediakan secara gratis.

    Buffer memiliki Do Share juga. Anda tidak perlu browser untuk menjalankan saat publishing, Buffer akan mengurusnya secara otomatis.

    Tuesday, 25 February 2014

    Share Blog Posts in Social Media using AddThis

    In my opinion, AddThis is the most complete social sharing service allowing to share your posts in more than 270 different social networks. I use the AddThis widget, so if you would like to see a live demo, please scroll down to the bottom of this post to see the AddThis sharing buttons.


    This tutorial will show you how to register and add this feature on your blog and you will get to know some of the customization options of these buttons. So let's get started!

    Getting the AddThis share buttons code

    Step 1. Visit the https://www.addthis.com/get/sharing page.
    Step 2. To get the sharing buttons and to access the AddThis sharing stats to find out how many people shared your post by using the AddThis feature, click on the "Create account" button.

    create addthis account

    The site will ask you to make a small registration. Fill out the information to register. It's quick, simple and it's free. To finish the registration, click on the Register button.

    register addthis

    Step 3. After you've been logged in, right below the "Get sharing buttons for", choose the "A website" option.

    addthis share buttons

    Step 4. In the "Select style" section, choose the buttons style that you think would look the best on your site/blog. Please note that on the right side you can see a preview of these buttons.

    addthis sharing buttons

    Step 5. After you have chosen the style, the site will provide a code - click on the "Grab it" button to copy it.

    addthis code

    The code provided will look like this:
    <!-- AddThis Button BEGIN -->
    <div class="addthis_toolbox addthis_default_style ">
    <a class="addthis_button_facebook_like" fb:like:layout="button_count"></a>
    <a class="addthis_button_tweet"></a>
    <a class="addthis_button_pinterest_pinit" pi:pinit:layout="horizontal"></a>
    <a class="addthis_counter addthis_pill_style"></a>
    </div>
    <script type="text/javascript">var addthis_config = {"data_track_addressbar":true};</script>
    <script type="text/javascript" src="//s7.addthis.com/js/300/addthis_widget.js#pubid=ra-XXXXXXXXXXX"></script>
    <!-- AddThis Button END -->
    Now that you have selected and set up your AddThis sharing buttons, let's add them in the footer of the posts.

    Adding the AddThis sharing buttons on Blogger

    Step 1. Access your Blogger Dashboard and go to Template, then click on the Edit HTML button on the right:

    blogger template

    Step 2. Click anywhere inside the code area and press the CTRL + F keys to open the search box.

    Step 3. Type the following line inside the search box and try to find the second occurrence of it - hit Enter:
    <div class='post-footer'>
    Step 4. Just above this line, add the code for the AddThis social sharing buttons.

    Note: If you want to add at the beginning of your posts, add the code below the second:
    <div class='post-header'>

    How to add more AddThis buttons

    To add more buttons, simply choose the button for that social network and add the code just before the </div> tag (refer to the step 5 from above).

    Some examples:
    <a class="addthis_button_linkedin"></a> /* linkedin button */
    <a class="addthis_button_google_plusone" g:plusone:size="medium"></a> /*gplus button */
    <a class="addthis_button_digg"></a> /* digg button */
    <a class="addthis_button_stumbleupon"></a> /* stumbleupon button */
    <a class="addthis_button_print"></a> /* print button */

    CSS3 AddThis Share Buttons

    You can add just a single button, so that when the reader hovers over it, a menu will open with the options of social networks to share the post.

    css3 share buttons, addthis

    Visit this page for a demo.

    Step 1. Go to Template > click on the Edit HTML button > press the CTRL + F keys and search:
    <div class='post-footer'>
    Just above this line, paste the following code:
    <style type='text/css'>
    .addthis_share_btn a, .addthis_share_btn a:visited {
    background: #FF5C00; /* background color of the button */
    display: inline-block;
    padding: 6px 12px;
    font-family: arial,helvetica,lucida,verdana,sans-serif;
    font-size: 12px;
    line-height: 1em;
    color: #fff;
    text-decoration: none;
    -moz-border-radius: 5px;
    -webkit-border-radius: 5px;
    -moz-box-shadow: 0 1px 3px rgba(0,0,0,0.5);
    -webkit-box-shadow: 0 1px 3px rgba(0,0,0,0.5);
    border-radius: 5px;
    box-shadow: 0 1px 3px rgba(0,0,0,0.5);
    text-shadow: 0 -1px 1px rgba(0,0,0,0.25);
    border-bottom: 1px solid rgba(0,0,0,0.25);
    position: relative;
    cursor: pointer;
    }
    .addthis_share_btn a:hover {
    background: #D45500; /* background color on mouse hover */
    color: #fff;
    }
    .addthis_share_btn a:active { top: 1px; }

    .addthis_share_btn a span, .addthis_share_btn:visited a span {
    background: url(http://www.addthis.com/cms-content/images/gallery/icon-addthis.gif) no-repeat left;
    padding: 1px 0 1px 18px;
    }
    </style>
    <!-- AddThis Share Button -->
    <div class='addthis_toolbox addthis_share_btn'>
    <a class='addthis_button_compact' href='http://addthis.com/bookmark.php'>
    <span>Share</span></a>
    </div>
    <script src='http://s7.addthis.com/js/250/addthis_widget.js' type='text/javascript'/>
    <!-- End AddThis Share Button -->

    Customization

    - To change the color of the button according to the colors of your template, modify the color value in red.
    - If you want to change the "Share" text, replace the text in blue.

    Step 2. Save the changes by clicking on the Save template button and you're done!

    Thursday, 20 February 2014

    Gila! Facebook Membeli WhatsApp Seharga Rp 209 Triliun

    facebook-membeli-whatsapp
    Setelah sebelumnya mengakuisisi Instagram, kini sang rasa jejaring sosial itu membeli WhatsApp dengan harga USD 19 miliar atau setara dengan Rp 209 triliun. Tindakan Facebook ini sangat mengejutkan berbagai kalangan termasuk pengguna WhatsApp yang mengaku akan meninggalkannya karena dibeli Facebook. Tindakan Facebook mengakuisisi WhatsApp bukan tanpa alasan, banyak dugaan mengatakan bahwa Facebook ingin mengeksplorasi pengguna WhatsApp yang memang sedang populer di kalangan remaja. Hal yang berbanding terbalik dengan Facebook, karena secara demografi jumlah pengguna Facebook mulai berkurang dalam beberapa bulan terakhir.

    Angka USD 19 miliar itu tentu saja tidak semuanya dalam bentuk cash. Melainkan terdiri dari USD 12 milyar dalam bentuk saham Facebook, USD 4 miliar cash, serta tambahan USD 3 miliar berupa saham terbatas yang diberikan untuk pendiri WhatsApp dan sejumlah karyawannya. Jika dihitung per harinya, ada lebih dari 1 juta pengguna baru yang mendaftarkan di layanan pengirim pesan lintas platform ini. Saat ini melayani 450 juta pengguna setiap bulannya. Dimana sekitar 70% di antaranya termasuk dalam pengguna aktif.

    Pembelian WhatsApp ini cukup mengejutkan setelah sebelumnya raksasa jejaring sosial ini gagal membeli aplikasi sejenis asal Israel bernama Snapchat. Dahulu, situs yang disopiri oleh Mark Zuckerberg itu telah mengakuisisi Instagram dengan harga USD 1 milyar pada tahun 2012.

    Beberapa pihak memang khawatir Facebook akan merombak WhatsApp atau memasukkan iklan dalam layanannya. Padahal user sudah terlanjur nyaman dengan layanan WhatsApp seperti saat ini yang sederhana, tanpa iklan dan mudah digunakan. Kabar baiknya, CEO WhatsApp Jan Koum sudah meyakinkan bahwa WhatsApp tidak akan berubah meski dicaplok Facebook. WhatsApp saat ini belum pernah mencoba memasarkan apapun pada penggunanya. Pemilik WhatsApp memang sangat ketat soal ini, yaitu tidak ada iklan. Hal yang sama juga dikatakan Mark Zuckerberg. Facebook berjanji, WhatsApp bakal tetap beroperasi secara independen dan menggunakan brand yang sudah dirintisnya.

    Yah, semoga saja WhatsApp tetap berjalan pada jalurnya karena saya juga pengguna aktif WhatsApp. Menurut saya layanan pengirim pesan "WhatsApp" ini memang sangat mudah digunakan dan ringan.